Day 5 – Get Search Engines to Love You
 Day 5 Begins! Let’s do this!
 Day 5 Begins! Let’s do this!
We’re going to write content for our new website, which should be looking pretty good now. Don’t panic, I’ll try to explain this in a way to make it as simple as possible because I know mostly everyone hates writing.
This lesson is a little long because there’s a lot to get through. I’ll be referring you to other articles to read and they are a part of the course. If you have to extend this lesson and get in done in 2 days (or even 3), then that’s fine. Just take your time. Make sure you absorb the content. Don’t skip over it or go too fast. It’s important stuff!
Content for Your Website
On with content!
We’re going to talk about keywords and then about writing content or ways to get it written for you – in case you’re not a writer.
Here’s the list of keywords I found from a couple days ago – just to remind you (just skim over it as a reminder):
- star photography settings (590)
- taking pictures at night (260)
- how to take photos at night (260)
- camera settings for night photography (210)
- diving photography (170)
- best settings for night photography (110)
- photographing the stars (110)
- first underwater camera (70)
- camera setting for night photography (70)
- underwater imaging (50)
- amazing underwater photography (50)
- best underwater photographers (50)
- beautiful underwater photography (40)
- amazing night pictures (40)
- best iso for night photography (40)
- photographing photos (30)
- ideas for night photography (30)
- best compact camera for underwater (20)
- how to take long exposure photos at night (20)
- best dslr night photography (20)
- taking pictures of stars at night (20)
- camera setting for night shots (20)
- shooting pictures at night (20)
- taking photos of lights at night (20)
- the best rugged camera (10)
- best compact underwater camera 2014 (10)
- best waterproof camera on the market (10)
- what underwater camera to buy (10)
- night shot tips (10)
- amazing good night photo (10)
- taking city photos at night (10)
- taking photos at night with a dslr (10)
- what iso for night shots (10)
- taking pictures of lights at night (10)
- what to photograph at night (10)
- tips for photographing stars (10)
- stars night pictures (10)
Not all these keywords relate. That’s fine. We’ll work with them and use the ones that do.
I’m going to set up my new site so that it’s about photography in general (shooting pictures) but it’ll have categories about night photography and underwater photography since those were the first two groups of keywords I came up with.
Sure, I could add a lot of groups (categories) but I don’t have the content yet and if I started on too many topics at once, I’d be spreading myself out too thin. It’s best to just start with 1-2 sub-topics (sub-niches) where you can write some content and start to set your site up as an authority on those topics than write a little bit about a lot of things and not be an authority on anything.
So next, go ahead and create these 1-2 categories by going to:
Posts > Categories
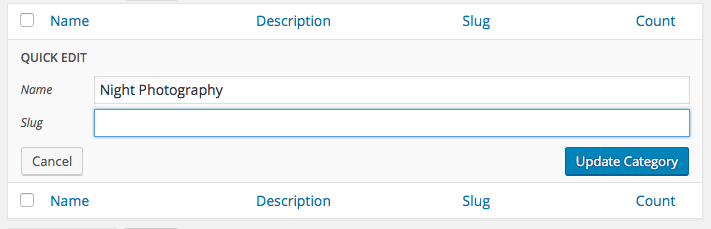
There’s probably one there already called “Uncategorized” so click on Quick Edit:

Then change it.
Just set the “Name” field, clear the “Slug” field and click “Update Category” to set it.
To create another category, go to the left side of the screen, put in the name and click “Add New Category” (the slug can be left blank – it’s automatically filled in by WordPress).
Next, let’s get the navigation set up.
Go to:
Appearance > Menu
Add a new menu by putting in a name and clicking the “Create Menu” button. This name can be anything as only you will see it – not anyone on your website:

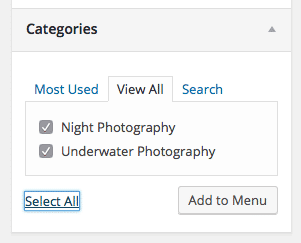
On the left side, open up “Categories” then click “View All” then select them all and click the “Add to Menu” button:
You’ll see them appear on the right.
You can drag and drop them to change the order. If you drag one under the other one, it’ll be a sub-menu. You probably don’t want that yet – maybe later when your website gets larger.
Next to “Theme locations” check the “Primary” box (this is for the theme I’m using – your theme might say something else) and then click the “Save Menu” button.
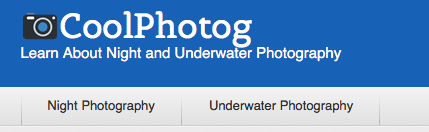
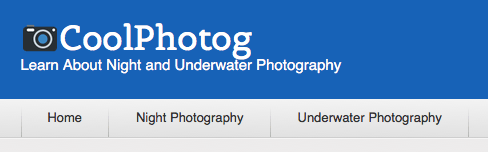
Your website should now have some navigation:
You can go to Pages then View All on the left and click Home and add that in if you like:
Let’s Get to Writing Already, Tony!
At this point, we have our website all ready for adding content. Finally! I know, right? 🙂 You’ll just go to:
Posts > Add New
to get a blank post. You have a title area, a place to write text that’s like creating a document, a publish section, categories, tags and featured images.
My video here will show you through these areas – it’s a little walk though:
And now that you know how to get around, it’s time to write some content. I’ve written a really good article on how to write content for a website and you can find the link to that below. One thing I don’t mention is the keywords part, so let me touch on that first.
The keywords you researched are important here. You’re going to want to get about 30 of them to use per article. Each article you write will be 900-1800 words or more. So yes, the minimum article you write will be about 900 words. It may take you a few days or even a week to come up with one that big but that’s how this works.
Most articles I publish now are in the 2000 word range. Some are up to 4000 words. You don’t want to write to get to a word count but you want to make sure you cover the topic well and it’ll end up being however many words it takes to do that.
Think of it this way… write content so good that people will want to share it with others. At the end of it, they should be thoroughly impressed. Google is going to be really impressed if you only pump out content that’s great.
I’ve noticed that the first piece of content on a new website is important. Google kind of classifies your website as being about that topic – so make a good, first impression!
Here are more, great tips you should read for writing an article (sorry it’s so long – I just wanted a comprehensive piece of content on my website):
14 Tips on How to Write Great Articles for Your Website (tonyherman.com)
So I might finish writing an article and be about 1800 words and by the time I read it over, add things and go deeper, I’m getting closer to 2500 or even 3000 words or more. That’s my process and it works pretty well.
If you need some headline/title ideas, check out my book, 113 Article Headline Examples – it’s free to get and you also get another book, 10 Essential Items for Any Local Business Website and even the 395 Power Words and Phrases book right here:
Each article you write should have:
- A compelling title
- 900+ words of text
- A main image
- A featured image
- An image every 500 words or so
- A related video from YouTube
- Links to 3-4 or more high authority websites
When you link to other websites that are authority websites, it makes your website a good resource and Google likes that. Just make sure your links are meaningful and not useless. Google is cracking down on this a little now.
What I like to do is refer to other websites that will help the people reading my content – you’ve seen that already because I’ve been doing it.
You can also do what they call “curate” content, which means you reference other pages and include a paragraph or two of their content. You then comment on it. Make sure you link to the page you got it from.
Fill in Your Meta Tags
Next, install an SEO plugin on your website. Two good ones are:
I’ve been using the All in One SEO Pack a long time, so that’s the one I prefer but many people are now using the Yoast SEO one.
Here’s how to install the All in One SEO Pack plugin:
And then this article gives you the list of plugins that I use often and ones that are worth installing to help your website:
The Top 21 Important Plugins to Use With WordPress (tonyherman.com)
If you don’t want to install them all now, that’s perfectly fine and you probably don’t need all those plugins – they’re just ones I use on sites. After this course is over, I’ll send you a follow up email going over this again. Right now, I want to make sure you’re writing content or having it written for you. That is the most important thing – getting something published.
Once that’s installed, go back into your article and go down, below it where you can edit the settings. It looks like this:
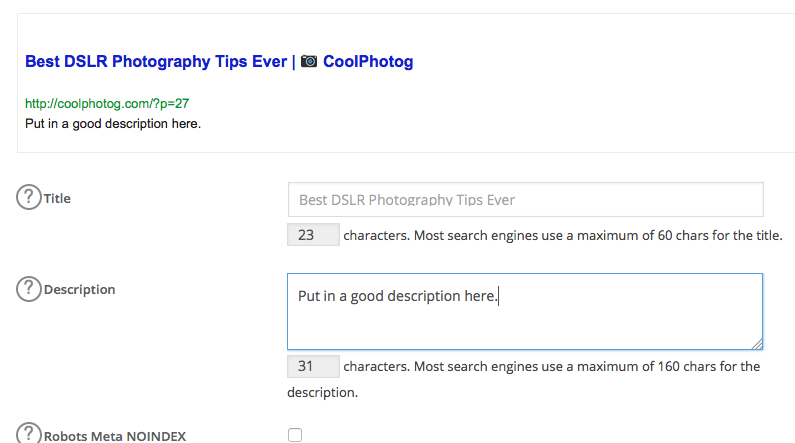
What you put in here is typically what Google decides to show when it lists your page as a result, so this text is very important. If you write a compelling headline and text, you’ll get more clicks and getting more clicks actually helps you rank higher (this is proven – but don’t go tell your friends to click on your links, that’s “black hat SEO” and can get you in trouble).
Here’s the strategy to making sure what you enter here is good:
- Use a compelling title. You should have a good one already for your article, so just leave it blank and it’ll use that one. Later, once you optimize the page, you can change it.
- For the description, start with an action verb. I like verbs like: Learn, Discover, Find out, Educate yourself, Get important information on, and so on.
- Also include words like this in the description – they are POWER WORDS: today, right now, fast, works quickly, simple, quick, easy.
- For the keywords, put in a few from your spreadsheet that you haven’t used yet. Don’t go crazy – maybe just 3-4 and you can always optimize later and add more.
Stick to the limits that you’re being shown. The title can only be 60 characters and the description can only be 160 characters.
I’ll Show You
And now that you’ve seen the pieces, I’m going to put it all together:
And that’s how you do it! Don’t worry, it actually gets kind of fun.
I reference a few things in this article:
- The post that is referenced is linked above and you should have read it already but here is a link to it.
- Find images for your website – here’s a list of those sites.
When Should You Post Articles?
It’s best to have articles post on Tuesdays or Wednesdays and not on holidays or weekends. When you post mid-week, your article has time to get a little traction before traffic dies down on the weekends (which is what happens with most websites).
As far as the time of day goes, schedule your posts to publish early morning. That way, people checking their email when they get to work will see your article (if you use the RSS to email method I explain on day 7).
With WordPress, you can schedule your posts so do take advantage of that feature. To do that, go to a new post and to the right of “Publish immediately” is “Edit” – click “Edit” then set a time and click Ok.
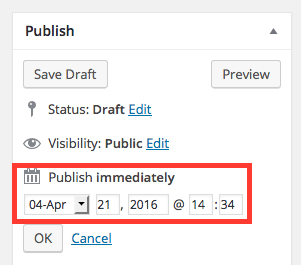
The button that used to say “Publish” will now say “Schedule” and your website will post the article then. Occasionally, it will miss the scheduled time. I don’t know why this happens, so it’s a good idea to check that articles publish when they’re supposed to – just in case.
So What If You Cannot Write?
If you absolutely, positively cannot write, then you’ll need to hire people to do writing for you. There are a number of sources you can use – and these are ones I’ve used before:
The source I like the most is The Content Authority – they do great writing and the process is super easy.
Get good articles written. That means don’t go with the cheapest level of writers because what you get will not be good – trust me. Get the top level or one level below it. You’ll probably pay $25-50 per article but it should be content worth posting.
You may think that spending $45 for an article is a complete waste of money. I get why you would think that because it’s just text, right?
Think About This (It’s Mind Blowing!)

Let me give you a different perspective on text and this is pretty much the coolest thing about this whole course…
You go to work, you punch in or show up at your desk, you do you work and then you get paid for that work you did that day or week. If you stop showing up for work, you won’t get paid anymore. That work you’ve done doesn’t benefit you at all.
Now, if you write some text that’s really good and you monetize that content and let’s say you start getting $1 a click when someone clicks an ad on that article. I’ve seen those rates before (or higher).
That one piece of content starts getting popular and you start getting 400 views a day. Out of that 400 views, you get 40 ad clicks. You’re now making $40 per day from that article or $280 a week, which is $1200 per month or around $14,600 per year! These results are not typical but they could happen – that’s the potential!
That one, great article pays for your rent/mortgage!
That article keeps going to work for you – every day. It’s on your website 24 hours a day, 7 days a week, 365 days a year. You did that work once and it keeps paying off – unlike your job now.
So what do you think of that?
Instead of working for someone else, you’re working for yourself! You do the work once and it keeps paying you!
Is that not incredible?!
Seriously, take a few seconds to think about that.
It almost makes you wonder why people go to work at all because the work they’re doing benefits someone else going forward and they just get paid once for it.
You post some great content and it keeps paying you, day after day! I have articles that do this for me every day.
This is how it works and why we’re doing this. It happens all the time. That’s why people are in this business and why they don’t have normal jobs but they do this stuff – they do Internet marketing. They can do a little per day or work hard for a day and take a few days off and enjoy their money.
And this is why spending $45 for a good article or taking a few days or a week to write something really, really good is worth that investment.
I really hope you get it now and want to write really good content for your website!
Section Conclusion
I gave you a lot of content here. This is probably about the heart of the whole course. It starts with choosing keywords and then using those keywords in your article. I put the most time creating this course into this one lesson. I feel it’s really important and I hope I explained things thorough enough for you.
You may need to review this lesson a number of times, that’s fine. It’s good to make sure you got all the points and understand it.
Homework
Start working on your first article. You might not get it done today. It may take a few days but you have your website all ready to go and the most important thing now is getting content up on it.
Once this 7 day course is over, I’ll be giving you ways to improve your website so that search engines like it more but for now, it’s good enough. It’s better to focus on writing content now than focus on the technical parts of a website. The sooner you get good, original content put on your website, the sooner you can start profiting from it.
Tomorrow we’ll go over how to monetize your website! There’s even a method that I list tomorrow where you can build your website so that it can bring in $2000 a month for you – wow!
